Help for CruzEditor
Prepared by Christopher Allen 2011
Table of Contents
What is CruzEditor?
CruzEditor is an Adobe AIR application built to
edit levels for the game Cruz. If you don't know what Cruz is, look it up at
http://www.chriskallen.com/cruz.
Installing and Running CruzEditor
You must have a version of Adobe AIR installed on your computer to
run this application. This can be downloaded free of charge from Adobe's
website.
First, double-click on the "CruzEditor.air" installation package. You will be
presented with a number of steps. You should pick the default settings whenever
possible.

If you get a screen that challenges the authenticity of the application because
the publisher is unknown, choose to proceed with installation. I'm the
publisher. Duh.
It really doesn't matter which folder you choose to install the application.
Remember where it is, though, because your work must be saved there if you're
going to use the development version of Cruz to test your own episodes.
It helps to create an icon on the desktop, which will be the Kroz "yellow
smiley face." This lets you launch the program quickly.

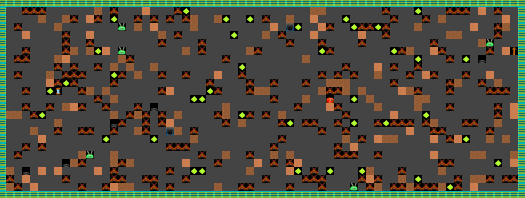
When CruzEditor starts up, it should display the main grid for a one-level
episode:
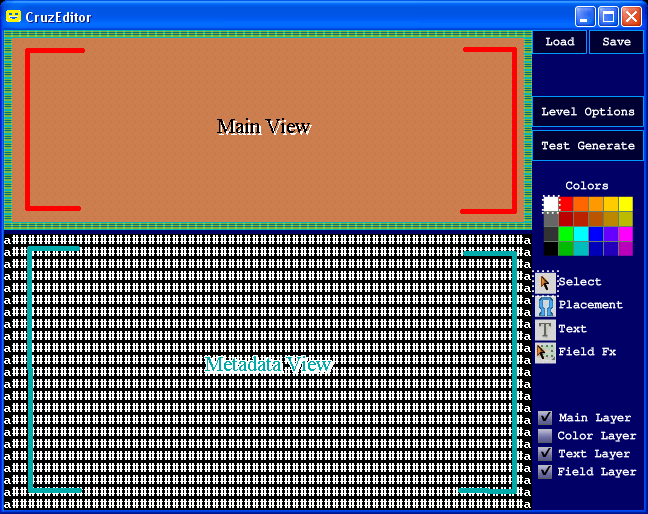
The window is split into a "main view" on top, which shows a graphical
representation of the level, and a "metadata view" on the bottom, which shows
the equivalent metadata character representation. Any action applied to one of
these views will be reflected in the other view; you can choose to edit in
either view.
Loading and Saving Levels
To load an episode, simply click "Load" to load an XML file
that was previously saved in the Cruz format.
It is also possible to load a BARfly XML port of a Kroz source
code file, but this requires knowledge of how to use BARfly to convert and dump
the original Kroz Pascal source code level files. It is better just to work
with those specific to CruzEditor.
To save the current episode, click "Save." Note that you must
specify the target each time, with an overwrite prompt each time. This is not a
flaw with the application, but rather a limitation of the AIR platform (save
dialog does not permit a default filename).
Cruz level files are loaded and saved on a per-episode basis.
You can save as many as 255 levels in an episode.
Editing Levels
The editor looks best when maximized; this gives you the most
screen detail. A resolution of 1024x768 or greater is recommended.
An episode contains multiple levels. Switch between these levels by using "-"
and "+" keys. To start editing, click the "Placement" button
on the right, or press "P." You are given a list of various
item names. Select one with the mouse, and then you can draw on the grid with
the mouse to place that item.
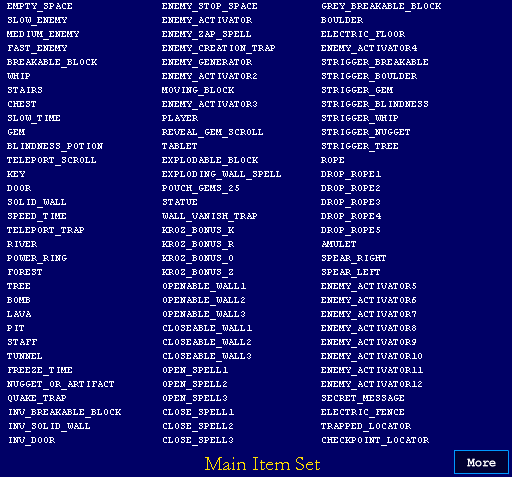
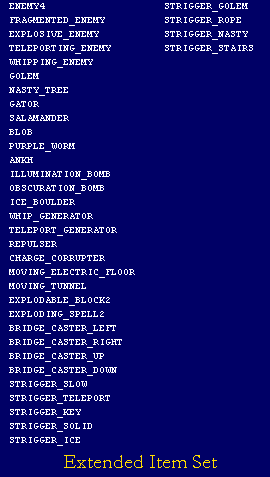
There are two placement selection windows: the main item set
and the extended item set. The main item set has, for
the most part, all the item types used in the original Kroz games. The
extended item set, accessible by clicking the "More"
button, contains new items used only in Cruz.
With an item picked, you can draw over either the "main view"
section (top half) or the "metadata view" section (bottom
half).
You don't need to understand all the character encodings. This just
indicates how the items are saved, in case you want to directly edit the XML
later.
There is another way to pick a placement item: position the
mouse directly over a grid square and press "Enter." This will
change the placement item to the type under the mouse cursor.
To select a region of the grid, click the "Select" button on
the right (or press "S"), then click or drag the mouse over a
section of the grid.
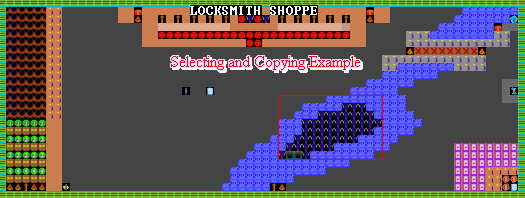
With the select tool, you can do the following by using the keyboard:
Ctrl+C: Copy selected region to clipboard.
Ctrl+V: Paste clipboard to grid at upper-left part of selection.
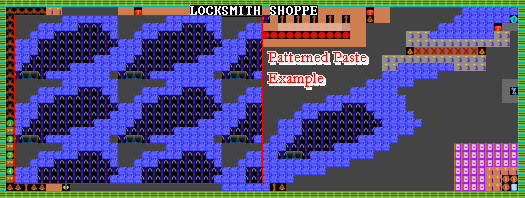
Space: Paste patterned clipboard data within entirety of
selection.

The patterned paste method, invoked by pressing "Space, "
fills the entire selection with the clipboard contents. If more than one grid
square was copied to the clipboard, the brush pattern will be tiled across the
selection.
The Different Layers
There are four layers in a typical Cruz level:
1) Main layer
2) Color layer
3) Text layer
4) Field Effects layer
You can show or hide the layers by clicking the appropriate checkbox on the
right.
Your mouse and keyboard actions apply to all visible layers when the select
tool is used. For example, if the color, main, and text layers are all checked,
your mouse actions affect all layers.
The color layer was planned for adding color hues to parts of the level.
However, this feature was not ultimately used in the game, so editing in this
layer is not possible. The color palette does not currently do anything in
CruzEditor.
The text layer lets the user enter text that will appear written on the walls
during the game. After the "Text" button on the right is
clicked (or "T" key is pressed), click on the grid to pick the
text entry spot. You can then write ASCII characters to the text layer by using
the keyboard. To erase previously entered text, just type a space over the
character.
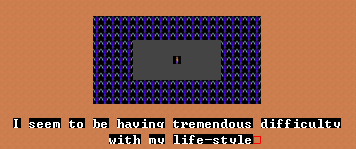
The text layer does not set any character encodings on the main
layer. However, the game itself will modify the main layer during pre-map if
there is a text character at a particular spot.
If you want to enter a non-standard ASCII text character into the layer, you
can copy it from the file "textchars.xml," provided with
CruzEditor. You cannot enter any characters that don't appear in this file, as
it would cause corruption of the metadata (XML parsers become confused).
The field effects layer contains a number of rectangular regions that modify
the grid in some fashion. To place a field effect, click the "Field Fx"
button on the right, then select a field effect type from the list. Then, you
can drag the field effect over a section of the grid, making the effect apply
to the rectangular area.

To delete a field effect, change to selection mode, click on the
rectangle, and the text will turn from red to white. When the text is white,
press the Delete key to remove the effect from the level.
Kroz games did not originally support field effects. Cruz uses them
as a way of equalizing a level's difficulty, adjusting aspects about the level
that might otherwise be too random to work well, and introducing interesting
new design features.
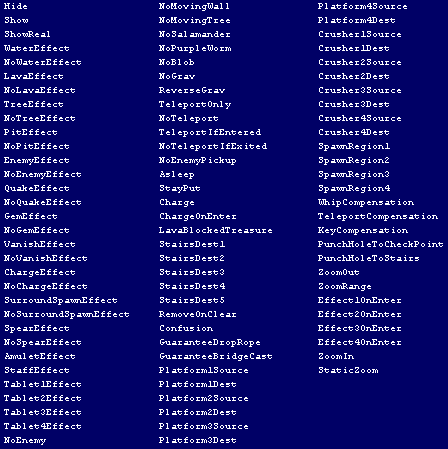
Not all field effect types shown in the list were implemented in
the game. See "Properties of Field Effects" to learn
about the implemented field effects.
Level Features
Level features are characteristics about a level
that control how the entire level looks, plays, and functions. Most level
features have meaning all by themselves. Other level features are used in
conjunction with certain object types or field effect types.
To access level features, click "Level Options" and select the
"Level Features" radio button. Level features are modified by
editing the XML in the window, and clicking "Accept" to save
the changes made to the features. The "Discard" button
discards any changes.
Note that CruzEditor displays an error message if any part of the accepted
content is not well-formed XML. Of course, if you're going to edit XML, you
should understand the syntax, since it's pretty straightforward.
Also, Cruz develops loading problems if features are specified the wrong number
of times. Most features can only be specified once per level (such as BackTile).
Only a few can be specified multiple times, such as QuakeType).

Kroz supported a handful of level features, most of which are available in Cruz
as well. These are described below.
LavaRate, TreeRate, EvapoRate
<LavaRate val="40"/>
<TreeRate val="70"/>
<EvapoRate val="22"/>
<LavaFlow val="false"/>
The "rate" is actually a number of random spot-check "attempts" to find a
particular terrain for growth or shrink actions during a frame of action. A
higher rate implies more check attempts per frame of execution, and thus a
nominally faster growth rate (or shrink rate). There is a 1/10 chance on
any given frame of action that lava, trees, or water will undergo growth or
shrink actions.
The rate will pick up dramatically when more of the growing or shrinking item
exists on the level, since more "hits" will be successful.
Lava growth occurs automatically if LavaRate is set to a
number greater than 0. It is possible to defer lava growth by setting <LavaFlow
val="false"/>. The reason for this is because some levels have
special effects that cause lava to grow on a scripted event, instead.
Hide Item Type
<HideMBlock val="true"/> (Hide moving breakable walls)
<HideGems val="true"/> (Hide gems)
<HideOpenWall val="true"/> (Hide open-wall spells)
<HideRock val="true"/> (Hide boulders)
<HideStairs val="true"/> (Hide exit stairs)
<HideTrap val="true"/> (Hide teleportation traps)
<HideCreate val="true"/> (Hide creature creation traps)
<HideLevel val="true"/> (Hide EVERYTHING in level)
It is possible to hide a certain item, or even all items, from view on a level.
Some levels are all about secrets, and hiding certain items from view can
increase the challenge significantly.
Note that anything that moves to another square is no longer hidden from view
after moving. The moment an item moves or is touched, it becomes visible for
the remainder of the time the level is played.
Hiding the exit stairs is useful in three contexts:
1) Exit is a winding corridor, and reaching the corridor is sufficient to end a
level.
2) Level is sideways, and the boundaries of the screen are sufficient to end a
level.
3) Special challenge to uncover a hidden exit.
Even if creature creation traps are not hidden, they appear as "chance" items
until they are whipped.
Event Timeouts at Level Start
<TimeoutSlowEnemy val="580"/>
<TimeoutMediumEnemy val="30000"/>
<TimeoutFastEnemy val="1700"/>
<TimeoutMBlock val="75"/>
Several events occur as bulk operations, like monster movement, and occur with
specific timing. A "timeout" level feature changes how much time must elapse
before the FIRST event occurs. After this time passes, movement proceeds at its
default rate.
Enemy Generator Rate
<GenFactor val="28"/>
This controls the probability that an enemy will be generated on any given
frame, if there are enemy generators on the level. In this example, the
probability would be 1/28.
Gravity Characteristics
<GravOn val="true"/>
<Sideways val="true"/>
<GravRate val="3"/>
Lost Adventures of Kroz and Kingdom of Kroz II support levels with partial or
total gravity. The level designer has two options when constructing gravity:
1) Set GravOn to true and Sideways to true to
make a sideways level.
2) Set GravOn to true and GravRate to a
specific value to make a level with partial gravity.
A sideways level only allows the player to move sideways or down, unless a rope
or drop-rope item is grabbed, in which case, the player can move in any
direction. Enemies also have restricted movements in sideways levels.
A level with partial gravity is just like a normal level, except that the
player is gradually dragged downwards. The player can still move in any
direction. Enemies are not affected by partial gravity.
GravRate is a bit misleading because it is a delay counter--a
higher value actually reduces the rate the player falls. By default, GravRate
is zero for sideways levels (meaning the player falls very fast), and
20 for levels with partial gravity.
Magic Electric Walls
<MagicEWalls val="true"/>
Set this to true to make high-voltage electrified walls randomly appear and
disappear. There is a 1/8 chance on any given frame of action that these walls
will cycle. If cycling does occur, such walls will be replaced by the type
closeable wall #1 (or closeable wall #1 types with electrified walls).
The fact that a closeable wall type is used as the "off toggle"
type means that the level designer should avoid using the type CLOSEABLE_WALL1
in the same level in its normal context, since the result
would be unpredictable and (probably) undesirable in the event the player
collects a CLOSE_SPELL1 type. On the other hand, it might be
beneficial to place CLOSEABLE_WALL1 types in the level to
allow for electrified walls to appear unexpectedly.
Item Appearance Changes
<Slow val="154"/>
<Medium val="148"/>
<Fast val="1"/>
<Breadcrumbs val="true"/>
Some levels have items with an altered physical appearance. Enemy ASCII
character representations can be changed to assume a modified character.
Cruz employs improved graphical changes to enemies resembling the altered
characters. The following values can be used to alter appearance:
<Slow val="154"/> : Dotted-U character
<Slow val= "254"/>: Square character
<Slow val= "255"/>: Invisible
<Medium val="240"/>: 3-lined character
<Medium val="255"/>: Invisible
<Fast val="9"/>: Bubble creature
<Fast val="1"/> : Smiley face character
<Fast val="255"/> : Invisible
There is a level in Lost Adventures of Kroz where empty spaces are
drawn as "bread crumbs." Use the Breadcrumbs tag for
this.
Level Features Specific to Cruz
Additional Growth and Shrinkage Rates
<FloodRate val="40"/> (Rate of water growth)
<PitRate val="10"/> (Rate of pit growth)
<TreeEvapoRate val="30"/> (Rate of forest disappearance)
<LavaEvapoRate val="20"/> (Rate of lava disappearance)
<PitEvapoRate val="15"/> (Rate of pit disappearance)
<TreeFlow val="false"/> (false defers forest growth or shrinkage)
<WaterFlow val="false"/> (false defers water growth or shrinkage)
<PitFlow val="false"/> (false defers pit growth or shrinkage)
Cruz supports many more terrain growth or shrinkage rates and deferral flags,
including rates for water growth, pit growth or shrinkage, forest shrinkage,
and lava shrinkage.
A nonzero rate starts growth or shrinkage when the level starts. If TreeFlow,
WaterFlow, or PitFlow is set to false, the growth or shrinkage is deferred
until a scripted event.
Unlike the other deferral flags, WaterFlow defaults to false, which is the
original Kroz behavior. It must be set to true to start water growth or
shrinkage at level start.
Hiding and Showing Item Types
<HideItem type="TABLET"/>
<ShowItem type="REVEAL_GEM_SCROLL"/>
<ShowRealItem type="ENEMY_CREATION_TRAP"/>
Cruz lets you hide or show any item type when the level first appears. The
"type" attribute can be set to any string shown in the toast message box when
you select an item type for placement in the grid.
Some items appear as "chance" pouches when visible. If you want to reveal item
type with no ambiguity, use ShowRealItem instead of ShowItem.
Item Replacement Characteristics
<Replace src="QUAKE_TRAP" dest= "SOLID_WALL"/>
<NoReplace src= "QUAKE_TRAP" dest="ENEM4"/>
On any given level, you can fine-tune how one item interacts with another when
a "source" item needs to replace or otherwise impose its effects on a
"destination" item. The Replace element guarantees that the
item or its effect will replace the other, while the NoReplace
element guarantees the opposite: no replacement can ever occur.
Use Replace to ensure that one item or spell can be used to
replace or eliminate another type of item. Use NoReplace to
safeguard certain items against lava flow, quake traps, etc.
Item Behavior Modification
<StartStayPut type="FAST_ENEMY"/>
<QuakeType type="BOULDER"/>
<TunnelBehavior type="random"/>
<TextBehavior type="solid"/>
StartStayPut can be used with most types of enemies. StayPut
enemies will not move, but will still attack the player if the player
is one square away.
QuakeType can be any type of item. It is "BOULDER" if not
explicitly specified. Earlier Kroz games had it set to "BREAKABLE_BLOCK." If
more than one QuakeType element appears, an earthquake trap
will spawn all the types mentioned with equal probability. You can make
some types fall with greater probability by specifying the types repeatedly.
For example, specifying BOULDER twice but BREAKABLE_BLOCK once will drop, on
average, two boulders for every one breakable block.
TunnelBehavior can be "roundrobin" (the default), or
"random." The round-robin system makes all tunnels traversed sequentially
if the player keeps revisiting them. The random system is the original Kroz
behavior, which randomly selects a destination every time.
TextBehavior can be "onehit" (the default, requiring one whip
strike), or "solid" (can't be destroyed).
Text Messages
<StartText>...</StartText> (when level starts)
<EndText>...</EndText> (when stairs to level found)
<AmuletText>...</AmuletText> (when AMULET type collected)
<StaffText>...</StaffText> (when STAFF type collected)
<Tablet1Text>...</Tablet1Text> (when tablet 1 collected)
<Tablet2Text>...</Tablet2Text> (when tablet 2 collected)
<Tablet3Text>...</Tablet3Text> (when tablet 3 collected)
<Tablet4Text>...</Tablet4Text> (when tablet 4 collected)
<Hint1Text>...</Hint1Text> (when Effect1OnEnter region
entered)
<Hint2Text>...</Hint2Text> (when Effect2OnEnter region
entered)
<Hint3Text>...</Hint3Text> (when Effect3OnEnter region
entered)
<Hint4Text>...</Hint4Text> (when Effect4OnEnter region
entered)
<SecretMessageText>...</SecretMessageText> (when
SECRET_MESSAGE type touched)
You can display text on the screen in response to a specific event. Text can be
either a single line (no line breaks) or two-line (one line break).
Tablet/text associations are ordered according to their spawn
order, which is left-to-right and then down for ordered levels, and arbitrary
for unordered levels.
If text is two-line, a line break in the XML itself is interpreted as a line
break in the text output.
The window used to display the text can be changed by preceding the
text with a special character. By default, an ordinary blank white window
appears over the status bar. To display a quoted text bubble, indicating the
player is talking, precede the line with a caret (^). To display a tablet
message, precede the line with an at symbol (@). Note that there is only room
in the tablet window for a single line, not two lines.
You can separate multiple messages from each other by placing the
characters "\n" at the end of a message. Do not confuse this markup
with an actual line break, which simply moves the remaining text to the next
line in the window.
Cruz supports several scripting commands in the body of text
messages. To specify a script command, use the "#" character. See
"Scripting Commands" for more information.
Conclusion Screen Text
<ConclusionText>
<TopCenter>Top Title Bar Text</TopCenter>
<MainText>Main Text Displayed</MainText>
<BottomCenter>Top Title Bar Text</BottomCenter>
</ConclusionText>
This element specifies what text is shown on the conclusion screen.
A conclusion screen is displayed whenever the #WARPBACK scripting
command is used.
The main text is required. The top-center and bottom-center lines
are optional.
Item Counts and Probabilities
<StartItem type="GEM" count="20"/>
<StartItem type="WHIP" count="2"/>
<StartItem type= "TELEPORT_SCROLL" count="0"/>
<ChanceItem type="KEY" oneoutof="25"/>
<ChanceItem type="POUCH_GEMS_25" oneoutof="1"/>
<ChanceItem type="BOMB" oneoutof="40"/>
The StartItem element declares number of inventory items
the player starts with at the beginning of the episode. Only the types
GEM, WHIP, TELEPORT_SCROLL, and KEY are recognized.
The ChanceItem element manipulates the probability that a
particular item type will be shown as a "chance" pouch when the level
starts. Setting a ChanceItem value to zero means the item will
never appear as a "chance" pouch.
Alternate Destinations
<StairsDest1 name="level1"/>
<StairsDest2 name="level2"/>
<StairsDest3 name="level3"/>
<StairsDest4 name="level4"/>
<StairsDest5 name="level5"/>
By default, stairs take the player one level down, in the order the index
specifies. Field effects can be used to associate some stairs with alternate
destinations (1 through 5). The name attribute identifies the destination by
level name.
Kroz was originally a linear game, which prevented the player from backtracking
or revisiting areas. Alternate destinations can make a Cruz game more like an
RPG. Even though "The Underground Empire of Cruz" only used alternate
destinations for secret levels, it is entirely possible to create a game that
resembles a map with locations that can be revisited.
Item Appearance Modifications
<ItemAppearance src="NASTY_TREE" dest="TREE"/>
<ItemAppearance src="NUGGET_OR_ARTIFACT" dest="SOLID_WALL"/>
<ItemAppearance src="STAFF" dest="TOME"/>
The appearance of an item can be changed to a new type when the level is
initially shown. If the object moves, though, its actual appearance is
revealed.
It is possible to disguise almost any item type as any other type,
allowing for some interesting level designs.
The AMULET, STAFF, TABLET, and SECRET_MESSAGE types can be tweaked
to special types not resembling any of the placement types. The special types
are as follows:
SKELETON : A skelton of an unfortunate adventurer.
CROWN : A crown.
GRAIL : A cup resembling the Holy Grail.
FOUNTAIN : A fountain.
TOME : A sacred book.
KEYSTONE : The Cruz Keystone.
KEYLOCK : The Cruz World Creation Chamber lock.
GLOBE : A crystal globe.
Aesthetic Features
<NoAnim type="LAVA"/>
<Border type="SOLID_WALL"/>
<Backtile val="4"/>
<BaseZoom val="0.3030303"/>
It is often helpful to fine-tune the appearance of a level, for
performance, appearance, or other reasons.
NoAnim prevents a certain type of terrain from
being animated. Valid types are LAVA, RIVER, PIT, and TELEPORT_TRAP. The
main reason to prevent animation is performance--a screen filled with these
types might slow down the game to an unacceptable level.
Border sets the type used as the border. By
default, the border is an electrified fence, the border for all the Kroz games.
You can set the border to any type in Cruz. However, be warned that most
types do not properly "fence in" the action. An improperly selected border
type might cause problems if a game object "escapes."
Backtile sets the floor tile for empty space. The
tile can be one of the following:
1 : Blue (goes best with water).
2 : Green (goes best with forest).
3 : Red (goes best with lava).
4 : Orange.
5 : Yellow.
6 : Brown (default if not set).
7 : Cyan.
8 : Purple.
9 : Turned-off electrified background.
10 : Ice background (also appears when ice block used as
bridge).
11 : Horizontal bridge (cyan).
12 : Vertical bridge (cyan).
BaseZoom sets the highest value for the scale
factor for dynamic zoom mode. This defaults to 0.5, but it can be set
higher or lower. Setting it to 0.3030303 will force the display to be
zoomed out so the entire level can be seen (the original Kroz behavior).
Miscellaneous
<BlobRate val="1000"/>
<CorrupterFactor val="15"/>
<Music val="3"/>
<HideLevelNumber val="true"/>
<PatchNumber val="true"/>
BlobRate modifies the rate at which BLOB types in
the level expand. By default, this is 120. The rate is a count of game
tick iterations before the next expansion event. You can set this to a high
value (tens of thousands) to effectively prevent blobs from expanding.
CorrupterFactor operates in a similar way as GenFactor,
except it applies to mind corrupters. By default, this is 4, indicating a
berserk-inducing event occurs with a 1/4 probability.
Music sets the background music for the
level. The index is either zero (for no music, the default) or one of the
following values:
1 : Forest Theme
2 : Medieval Theme
3 : Percussion Theme
4 : Lava Theme
5 : Peaceful Theme
6 : Metal Theme
7 : Water Theme
8 : Pit Theme
9 : Corridor Theme
10 : Puzzle Theme
11 : Final Level / Title Screen Theme
12 : Bottomless Pit Clip (not designed to loop)
13 : Victory Clip (not designed to loop)
14 : "NES Chiptune" variant of Puzzle Theme
HideLevelNumber simply prevents the level number
from being shown in the title bar. For RPG-style games, or for levels for which
the number does not matter like secret levels, this should be used.
PatchNumber creates the code to be used later in a
code-entry screen, and patches Tablet1Text to reveal this code. Until and
unless the code is revealed, code entry in a later level is not possible.
Unordered Spawn Counts
Unordered levels are put together by spawning a particular item at
a random location. This process is repeated a preset number of
times for each item type. Unordered spawn counts control how many times each
item type is placed in the grid.
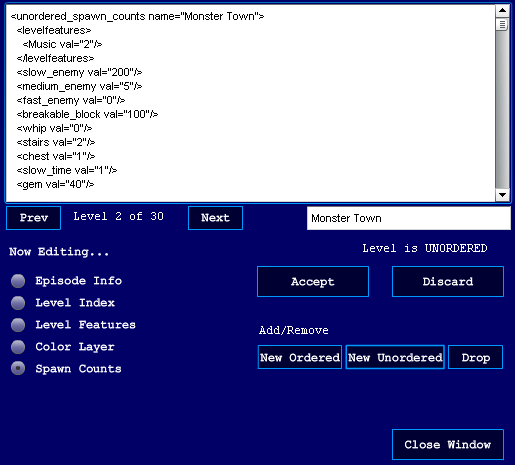
To access unordered spawn counts, click "Level Options" and
select the "Spawn Counts" radio button. Spawn counts are
modified by editing the XML in the window, and clicking "Accept"
to save the changes made to the counts. The "Discard" button
discards any changes.
It is not necessary to have a spawn count for the player. The player implicitly
appears in the level.
IMPORTANT: Don't forget to include at least one
spawn count for the stairs, or else some mechanism in the level for generating
stairs.
If the total number of spawn counts exceeds the maximum number of grid
positions (1,472), the level will automatically crop the highest spawn counts
until the total drops to the maximum or lower. It is better practice to
calculate the counts yourself and make sure the total is not unreasonable.
You can test what an unordered level would look like with the "Test
Generate" button. There is no guarantee that a level will actually
look like the results shown, since it is randomly generated each time, but this
at least gives you some idea.
Special Operations
The "Level Options" button gives access to many
additional features.
Changing Level Name
If any radio button other than "Episode Info" or
"Level Index" is selected, you can edit the level's name by typing
a new name into the box below the main XML display, then clicking "Accept."
A level's name must be unique. CruzEditor will develop problems if you
duplicate names in the collection.
Adding or Dropping a Level
You can add a new level by clicking the "New Ordered"
or "New Unordered" buttons. The new level will be added to the
end of the collection.
After creating new levels, you should rename them before saving. If you don't,
the default names will be picked again if you add more after quitting
CruzEditor, causing duplicate name issues.
You can delete an existing level by clicking the "Drop" button.
As a precaution, you must confirm dropping a level with two clicks.
Episode Info
The "Episode Info" radio button allows you to edit
information describing the entire episode. Most of the information just serves
to describe the episode, but there are some tags that have an effect on the
game content.
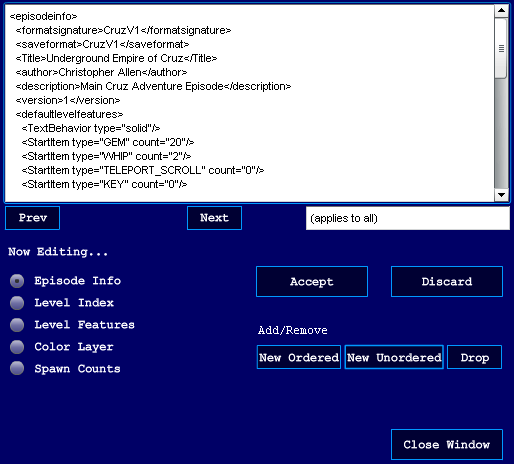
<Title>Dungeons of Kroz</Title>
<gametype>Cruz</gametype>
<defaultlevelfeatures>...</defaultlevelfeatures>
Title is the formal identification for the episode, and is
shown in the title bar if set. If not set, the game filename is shown.
gametype identifies whether this episode is a Kroz
or a Cruz game. By default, "Kroz" is assumed. The "Cruz" setting
only changes a handful of things, such as the appearance of the bonus letters
and various references to either "Kroz" or "Cruz" within the episode itself.
defaultlevelfeatures contains a set of "global
level features." Almost anything that can be set in levelfeatures
can also be set here.
If you have a level feature that will be common for most if not all
levels in the collection, it is easier to set the feature at the episode level,
instead of having to set it for each level individually. The most useful tags
to set at the episode level are TextBehavior, TunnelBehavior, StartItem,
ChanceItem, and QuakeType.
Note that if a feature appears at both levels, the value set in
levelfeatures will trump the value set in defaultlevelfeatures.
Level Index
The "Level Index" radio button allows you to edit
the episode's play order for the levels.
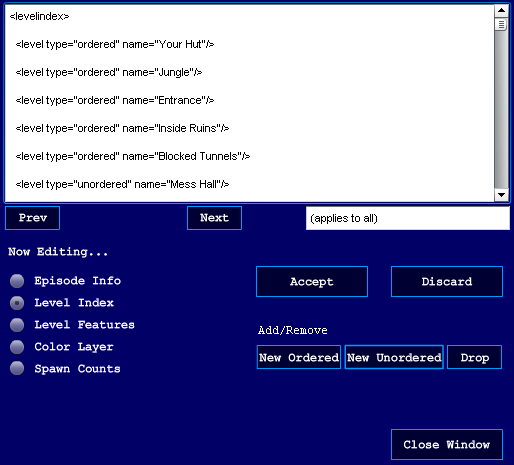
You cannot add, copy, or remove levels from the collection by editing the
index, nor can you change the ordered/unordered type. Attempting to edit the
level index for a purpose other than rearranging the play order may cause game
file corruption.
Properties of types
Useful properties of certain item types are described below.
Doors
Since keys are needed to open doors, be careful when making a level
that requires keys from previous levels. If the user wastes a key, he or she is
stuck, which renders an autosave useless. This might be especially likely if
the level has lots of invisible doors.
Keys
Enemies can pick these up, which forces the player to kill the
enemy in order to retrieve the key. You can make some keys a lot more difficult
to obtain by letting purple worms or golems grab them without any direct way to
dispatch them.
Chests
Different versions of Kroz implemented different types of chest
contents. In Cruz, the chests will always give between 2 and 9 gems, and
between 2 and 3 whips.
Forests, Trees, and Lava
Level features can be set to make these grow. They grow
mercilessly, but there are some types that prevent them from growing.
In the case of lava, closeable wall #1 and #2 will stop it from growing, but
closeable wall #3 will not. The activator types #5 through #12 will also stop
lava, but activators #1 through #4 will not.
In the case of forest and trees, all closeable wall types will stop it from
growing. The activator types #4 through #12 will also stop vegetation growth,
but activators #1 through #3 will not.
Bombs
Bombs are best if strategically placed. The area of effect is
always a 9x9 square. This means a bomb can "reach" 4 squares left, right, down,
and up. By measuring appropriately, you can determine exactly which enemies or
doors can be destroyed.
Bombs have a curious property: they can destroy invisible solid walls, provided
the wall had not already been touched and revealed.
Tunnels
The "TunnelBehavior" level feature determines how tunnels are
selected with repeated tunnel-hopping, if there are more than two tunnels in
the level. By default, each possible exit spot for every tunnel will be visited
once. With the "random" behavior, though, there is no guaranteed order or
preference for exits--it is possible to visit any number of exit spots multiple
times before arriving at a unique one.
The reason why one would want to use the "random" system instead of the
"round-robin" system is because tunnels do not allow the same tunnel entered to
be exited with a different exit spot. While not a problem in most cases, there
are some levels that have two different exit spots for each tunnel, but only
one of these exit spots allows progress. A round-robin system will, in this
case, prevent some exit spots from ever being reached, since the spot must be
skipped over (and the order starting over) if the random sequence happens to
pick two exit spots from the same tunnel, one after another.
It is desirable, for the purpose of quality level design, to have most if not
all tunnels allow for only a single exit spot. This makes the best use of the
round-robin system and introduces determinism to levels that require
tunnel-hopping.
You can make a tunnel one-way (acting as a source but not a destination) with
closeable wall #3. By surrounding the tunnel with this, the player can enter
it, but it will never be a valid exit spot.
Bottomless Pits
Use sparingly. A bottomless pit kills the player with no
possibility of redemption. A pit should punish recklessness; it should not
reward luck.
Quake Traps
These are invisible unless the item appearance is changed. Use one
or more QuakeType tags to control what the quake drops.
Enemy Creation Traps
Enemy creation traps actually have another function if the level is
sideways. In a normal level, lots of enemies spawn when the player steps on the
square. But in a sideways level, the trap instead takes 3 gems away.
Enemy Generators
Generators, if they are present, cause enemies to appear
sporadically around the level. The rate of creature creation does not depend on
how many generators exist on the level--the rate is the same if any exist, and
it drops to zero when all generators are destroyed.
Use GenFactor to control the generation rate.
Enemy Stop Spaces
Place these squares to stop enemies from advancing. When the player
crosses them, the space "dissolves" and an enemy is free to cross. Of course,
these don't work so well when used to fence in a group of enemies, because the
spaces are only eliminated on a piecemeal basis (the player has to walk over
every one in order to get every one to dissolve).
These items have one other function: they stop the player from teleporting to
them. In this manner, the player can be prevented from teleporting past
difficult parts of the level until after crossing them once.
Enemy Activators
These are improvements over Enemy Stop Spaces, because when the
player crosses just one, then EVERY OTHER activator in the level dissolves
instantly. This allows the level designer to have a great deal of flexibility
when it comes to scripted chases. Activators can be completely detached from
each other, so enemies can even be "freed" to attack when the player crosses
another area, far away. There are 12 different activator items, allowing up to
12 different scripted dissolutions on any given level.
Like Enemy Stop Spaces, activators are not valid teleportation destinations.
Player
This is the player's starting point. One and only one player must
exist in every level.
Tablets
A tablet gives 2,500 points and contains a unique message. Some
tablets also apply special effects to the level. Use Tablet(n)Text to set the
text and effects associated with tablets.
Pouch of 25 Gems
By default, this appears as a "chance" pouch. Use ShowRealItem to
make its appearance unambiguous.
Open-wall spells and close-wall spells (pentagon spells)
There are 3 instances of open spells and 3 instances of close
spells. Correspondingly, there is one type of special wall that appears or
disappears for each type of spell. By default, open spells are visible and
close spells are hidden. Use ShowItem to reveal close spells.
Closeable wall types
In addition to acting as placeholders for walls that close up,
these types have other functions:
-
Blocking monsters permanently (no dissolve after player traversal)
-
Inhibiting teleportation permanently
-
Preventing tunnel traversal to certain spaces (#3 only)
-
Acting as a possible toggle point for blinking electrified walls (#1 only)
-
Acting as a change type for tablet-based effects
-
Preventing surround-spawn triggers from spawning objects in certain locations
-
Preventing terrain growth (see description for forest, trees, and lava)
Exploding Wall Spells
Exploding wall spells make it easier to navigate past some
breakable walls. A special type of breakable wall marked as "explodable" is
opened when the spell is activated. By default, exploding wall spells are not
visible, but level features can change this. Cruz provides a second wall/spell
pair, allowing two exploding-wall events in a single level.
Surround-spawn Triggers
Many types of invisible surround-spawn triggers exist. Depending on
context and type, a trigger might be intended as a trap, a bonus, or even a
necessary feature to complete a level. These triggers do not overwrite other
items on the grid upon activation, UNLESS there are other adjacent triggers, in
which case, such items are destroyed to make way for the spawned items.
You can inhibit items from spawning at certain points with any of the closeable
wall types, or with activators #5 through #12.
Drop Ropes
There are 5 different instances of drop-rope items. When the player
pulls one, all other instances of the same type in the level drop a rope until
a blocking wall or item is encountered two squares below. Ropes are only really
useful in sideways levels.
Secret Messages
In Lost Adventures of Kroz, there was a "secret message tree" that
displays a hidden message. You can customize secret messages and possible hints
they might give with SecretMessageText.
Trapped Locators
This is an item that signals when the player is trapped. A
compensation item for teleport scrolls appears if and only if the player first
walks across one of these in the level, then tries to teleport without any
teleport scrolls handy.
Teleporting Enemies
Since it isn't possible to hide from this enemy (they can jump over
any solid wall to seek the player), all the enemies at the start of the level
will eventually get the player or be destroyed if the player never stops
running away. You cannot use activators or walls to prevent them from reaching
the player. It is better to use scripted change events to spawn these enemies
if you want a chase to occur at a certain point in the level.
Golems
Since it is IMPOSSIBLE to destroy golems with whips, be wary about
how you expect the level to play out. If there are too many golems in tight
spots without any way to eliminate them (spears, bombs, acid, etc.), a single
wrong movement on the part of the player will force the player to waste a
teleport scroll, or even worse, have to restart the level. Golems should be
used for puzzles and intimidation, instead of rewarding lucky decisions and
timing.
Salamanders
Although a salamander is not hard to destroy, salamander placement
is very important. A pack of salamanders, if placed in the wrong way, will make
the player waste many gems crossing dropped lava. Anticipate the path a
salamander would take before placing one arbitrarily.
Blobs
Blobs are not as serious an obstacle as lava, since they can be
whipped with minimal gem loss, but they can be a menace if overused. A clear
path through an acid field should be made apparent, and a blob should not be
fast-growing unless the designer does not intend for the blob to be fought off
directly.
Keep in mind that blobs are affected by speed/slow/freeze time spells.
Purple Worms
A purple worm starts off as a two-segment stub. If you want a
longer worm to challenge the player, you must place edible food in a line near
the worm's starting point, letting the worm "eat" its way to the correct size.
Although volvoxes were picked as the "favorite food" in the documentation, a
worm will grow in size after eating anything, inventory items included.
Illumination and Obscuration Bombs
These items have the same radius as ordinary bombs. Illumination
bombs do not only reveal hidden items--they also remove disguises on item
types, if ItemAppearance was used. Obscuration bombs will make walls and doors
into their "invisible" counterparts as needed. Note that spears and bombs can
be used on invisible solid walls transformed in this fashion.
Moving Electric Walls and Moving Tunnels
These features have the same game properties as their non-moving
counterparts. Periodically, they will "shift" randomly to empty squares.
Bridge Caster Spells
A bridge caster erases certain types of terrains in a directional
line, including lava, pits, water, and blobs. Nearly all solid types or items
stop a bridge caster. Enemy stop spaces, activators, and closeable wall types
also act as "invisible" stopping points.
Checkpoint Locator, Ankh, Whip Generator, Teleport Generator, Repulsor
These types were not ultimately used in the game and have little
meaning.
Properties of Field Effects
Only the field effect types used in the game will be discussed.
Hiding and Showing Regions
Hide
Show
ShowReal
These regions hide items from view or reveal items on startup. The effect
corresponds to the item-at-once level feature by the same name (HideItem,
ShowItem, and ShowRealItem).
If you use the HideLevel feature, the Show regions
are the only ones that will be visible at the start of the level.
Allowable Effect Regions
WaterEffect (water flooding and evaporation)
NoWaterEffect (water flooding and evaporation)
LavaEffect (lava spreading and shrinkage)
NoLavaEffect (lava spreading and shrinkage)
TreeEffect (tree spreading and shrinkage)
NoTreeEffect (tree spreading and shrinkage)
PitEffect (pit spreading and shrinkage)
NoPitEffect (pit spreading and shrinkage)
NoBlob (acid blob spreading)
EnemyEffect (enemy creation traps and generators)
NoEnemyEffect (enemy creation traps and generators)
QuakeEffect (quake traps)
NoQuakeEffect (quake traps)
GemEffect (reveal gem scrolls)
NoGemEffect (reveal gem scrolls)
VanishEffect (wall vanish traps)
NoVanishEffect (wall vanish traps)
SurroundSpawnEffect (surround-spawn triggers)
NoSurroundSpawnEffect (surround-spawn triggers)
SpearEffect (magic spears)
NoSpearEffect (magic spears)
These regions establish the area of effect for terrain growth or shrinkage as
well as certain spell effects. Use these in conjunction with specific level
features and items already placed within the level.
If one "____Effect" region appears for a particular type of
growth/shrinkage/spell, the effect is limited to only a single specified
region. Only one region per type is recognized per level; multiple "____Effect"
regions will not work. If no regions for the type are specified, the effect
ranges over the entirety of the level.
The effective region for a particular type of growth/shrinkage/spell can also
be limited by "No____Effect" regions. For such regions, the
effect will not occur within the specified ranges. Unlike "____Effect"
regions, it is possible to specify more than one "No____Effect"
region in the level.
Effect-on-Enter Regions
Effect1OnEnter (on-enter 1 special effect)
Effect2OnEnter (on-enter 2 special effect)
Effect3OnEnter (on-enter 3 special effect)
Effect4OnEnter (on-enter 4 special effect)
These regions cause a scripted message or event to occur when the
player walks over it. The message is only shown if the player walks over
certain types of empty spaces, including EMPTY_SPACE, ENEMY_STOP_SPACE, and the
activator types.
The text displayed will correspond to the appropriate level feature
of the same number: Effect(n)OnEnter will invoke Hint(n)Text.
Gravity Modification Regions
NoGrav (partial or total gravity inhibited)
ReverseGrav (gravity points up instead of down)
For any level that has gravity (partial or total), a ReverseGrav
region causes the player to slide upwards instead of downwards. Rope mechanics
are similarly flipped. Note that enemies are not affected; they will still
act as if gravity is normal.
Use NoGrav to stop player sliding, as well as
cancel sideways movement restrictions for the player. Once again, enemies are
not affected; they will still act as if gravity is normal.
Teleportation Control Regions
TeleportOnly (teleport trap or scroll can only come here)
NoTeleport (teleport trap or scroll cannot come here)
TeleportIfEntered (teleport trap or scroll can come here if region
entered by some other means)
NoTeleportIfExited (teleport trap or scroll cannot come here if region
exited)
While activators and enemy stop spaces can help to limit
teleportation destinations, sometimes these types aren't adequate for
controlling how the player should be able to move throughout the level.
Only one TeleportOnly region is allowed per
level. There can be as many NoTeleport regions in the
level as desired.
The NoTeleportIfExited type will not work properly
if the player starts in this region. Use NoTeleport instead.
Some levels, like "Tour of Cells," use NoTeleportIfExited to send
the user to a unique destination with each teleport. This guarantees that
no teleport scrolls or traps will be wasted on non-deterministic teleports.
Monster Modification Regions
StayPut (moving enemies given StayPut status)
Charge (moving enemies given charge status at start)
ChargeOnEnter (moving enemies charge when they enter this region--at any
time)
The effect of StayPut is similar to the level
feature StartStayPut, but with the effect applying to a region
instead of an enemy type.
The Charge effect makes enemies charge once
only. This is similar to the effect of a mind corrupter, which makes an
enemy type charge only a single time.
The ChargeOnEnter effect will force enemies to
stay put until the player becomes aligned, whereupon a charge occurs. The
effect never goes away--any enemy that wanders into this region during the
gameplay will charge.
Stairs Destination Modification Regions
StairsDest1 (stairs go to alternate destination 1)
StairsDest2 (stairs go to alternate destination 2)
StairsDest3 (stairs go to alternate destination 3)
StairsDest4 (stairs go to alternate destination 4)
StairsDest5 (stairs go to alternate destination 5)
These regions specify which alternate destination level slot the
stairs will lead to. These must be used in conjunction with the level
features by the same name.
Any stairs not marked by one of these will lead to the next level
in the collection's play order.
Confusion Mist Regions
Confusion (player's input directions are inverted)
Confusion zones reverse all input directions for the player. The player must
apply the opposite controls to move in the desired direction if using keyboard
movement. If the player is using mouse movement, movement is limited to only
one square at a time, requiring a click to each adjacent square.
These regions are the only way to place confusion mist. There
is no placement type for it.
Effect Extension Regions
GuaranteeDropRope (drop-rope chords guaranteed to
extend over region)
GuaranteeBridgeCast (bridge caster guaranteed to extend over
region)
These regions force a drop-rope or bridge caster item effect to
pause if there is an obstacle that would otherwise stop them from continuing in
a line. The effect will continue the moment the obstruction is removed.
Specific Spawn Regions
SpawnRegion1
SpawnRegion2
SpawnRegion3
SpawnRegion4
Spawn regions identify a portion of the level that subject to a scripted change
event. See the "Scripting Commands" section for
more information on how spawn regions work.
Camera Focus Regions
ZoomIn
ZoomOut
ZoomRange
Dynamic zoom mode normally just sets the zoom to the BaseZoom level and scrolls
with the appropriate pan mode. Item effects can cause other types of scripted
zoom behavior. Of course, it is also possible to break up the zoom
behavior in a level based on which side of the screen the player is on.
The ZoomIn region sets the scale factor to 1.0,
which is the maximum level of detail for the action. Not much of the level
can be seen, so it is unusual to want to zoom this far in. Bottomless pit
navigation is one context where zoomed-in view can be helpful.
The ZoomOut region sets the scale factor to
0.3030303, which shows the entire level at once.
The ZoomRange region sets the pan and scale factor
to encompass the range, zooming in or out as needed. Since the viewport
might not have the same proportions as the region itself, the view might be
zoomed out a bit more to capture every "corner" of the range.
A level's camera focus behavior should be designed
intelligently. Too many changes in zoom will be disorienting and
confusing. Forcing the zoom level to a specific region or value will
prevent these problems.
For levels that require the user to see the enemy movements on the
opposite side, a scripted zoom-out can be helpful.
Scripting Commands
The text message system in Cruz provides much more than just the
ability to put custom text on the screen. It is possible to create many
special effects in a level by using scripting commands within the text
messages.
The general format of a scripting command is the following:
#COMMAND(arg1,arg2,arg3)
The command is always uppercase and preceded by a number sign.
One or more arguments, contained in parentheses and separated by commas,
immediately follow the name of the command.
One important syntax consideration about scripting commands: whitespace
matters. Any spaces, tabs, or line breaks, from the start of the
command to the closing parenthesis, will potentially screw up the command
interpretation. Commands should resemble the example above, exactly as
written, with no spaces.
You can execute many commands in sequence by placing them
back-to-back, without any spaces between the end of one and the start of
another. The reason for lack of spaces is because any such spaces could be
interpreted as text itself, which causes a window to pop up showing the
text.
It is possible to have a "text message" contain nothing but
commands. For example, Hint1Text might have a #CHANGE
command and no text at all.
If you want to alternately execute commands and display text, make
sure to use the "\n" notation to indicate a pause after all text messages, at
which point the user must acknowledge the text window with input. Do not
include the "\n" markup after a command; this will cause an unnecessary pause.
The very last operation in a text message can be either text or a
command. If the last operation is a text message, there is no need for a
final "\n" as markup.
The following is a list of all recognized commands.
#CHANGE(srctype,desttype)
#SPAWNREGION1(srctype,desttype)
#SPAWNREGION2(srctype,desttype)
#SPAWNREGION3(srctype,desttype)
#SPAWNREGION4(srctype,desttype)
These commands cause scripted change events in the level. The
CHANGE command affects the entire level; the SPAWNREGION
commands affect only those regions set with field effects (see previous
section).
The source type and destination type can be any type shown in the
Toast message box when you select an item for placement.
Additionally, the source type permits one more type: the "ALL"
type. This indicates that all types in the range will be turned into the
destination type.
Be warned that not all types will act correctly if chosen as
destination types. This includes PURPLE_WORM, STATUE,
ENEMY_GENERATOR, and CHARGE_CORRUPTER.
#ITEMEFFECT(type)
This command invokes the effect normally associated with a
particular item. If this command is used, it must be the very last command
in the text message. All text and commands after this command are
ignored.
The following item effects are recognized:
SLOW_TIME
SPEED_TIME
FREEZE_TIME
BOMB (does not hurt player)
EXPLOSIVE_ENEMY (hurts player)
ILLUMINATION_BOMB
OBSCURATION_BOMB
BLINDNESS_POTION
TELEPORT_TRAP
QUAKE_TRAP
ENEMY_ZAP_SPELL
ENEMY_CREATION_TRAP
REVEAL_GEM_SCROLL
EXPLODING_WALL_SPELL
EXPLODING_SPELL2
WALL_VANISH_TRAP
OPEN_SPELL1
OPEN_SPELL2
OPEN_SPELL3
CLOSE_SPELL1
CLOSE_SPELL2
CLOSE_SPELL3
DROP_ROPE1
DROP_ROPE2
DROP_ROPE3
DROP_ROPE4
DROP_ROPE5
SPEAR_RIGHT
SPEAR_LEFT
STRIGGER_BREAKABLE_BLOCK
STRIGGER_BOULDER
STRIGGER_GEM
STRIGGER_BLINDNESS_POTION
STRIGGER_WHIP
STRIGGER_NUGGET
STRIGGER_TREE
STRIGGER_SLOW
STRIGGER_TELEPORT
STRIGGER_KEY
STRIGGER_SOLID
STRIGGER_ICE
STRIGGER_GOLEM
STRIGGER_ROPE
STRIGGER_NASTY
STRIGGER_STAIRS
BRIDGE_CASTER_LEFT
BRIDGE_CASTER_RIGHT
BRIDGE_CASTER_UP
BRIDGE_CASTER_DOWN
#GIVE(type,amount)
This command gives the player something (a negative value for
amount can also take something away).
Valid types are the inventory items (GEM, WHIP, TELEPORT_SCROLL,
KEY, POWER_RING) as well as SCORE, which gives points.
The amount must be an integer.
#INVENTORYBONUS(type,amount)
This command awards the player a point value for each inventory
item remaining.
Valid types are most of the inventory items (GEM, WHIP,
TELEPORT_SCROLL, KEY).
#SURGE(count)
Causes a rainbow flash to cover the screen. The count indicates the
number of flashes.
#DELAY(milliseconds)
Causes a delay before the next command or message. Note that timing
is only tracked to a resolution of a 30th of a second, not to the millisecond.
#SETLEVELFEATURE(name,value)
Modifies a level feature. There are only a few features that can be
set dynamically with this command: WaterFlow, TreeFlow, LavaFlow, and
PitFlow.
A value of 0 sets the feature to false. A value of 1 sets the
feature to true.
#CHARGE(x1,y1,x2,y2)
This command dynamically sets a ChargeOnEnter region
in the level, based upon the zero-based rectangular coordinates.
#MUSIC(index)
#MUSICONCE(index)
These commands change the background music. #MUSIC
will cause music to loop, while #MUSICONCE will not.
Refer to the Music level feature for index values.
#LOCKZOOM(0)
#UNLOCKZOOM(0)
These commands "lock" or "unlock" pan/zoom changes. The argument is
a dummy argument; set to zero.
Locking the pan and zoom variables can be useful at times. Some
events, like scripted change events, will implicitly grow the view to reveal
the entire affected range. If the zoom is locked, no change will occur.
Be sure to call UNLOCKZOOM after calling LOCKZOOM,
or else the view will be locked after the game resumes.
#SHOWQUESTITEM(type)
#DROPQUESTITEM(type)
Use these to make the player show off or drop a collected
item. Usually, this is a STAFF or AMULET type.
#PLAYERFLASH(0)
Use this to make the player flash, as if about to teleport. The
argument is a dummy argument; set to zero.
#WARPBACK(0)
This command invokes the "victory" sequence, with the player
teleporting out, the inventory bonuses shown, and the conclusion screen (if
any) displayed.
The argument is a dummy argument; set to zero.
Level Design Suggestions
It is difficult to tell everyone what they should or should not
design, given that quality in level design often depends on an individual's
freedom to create. I can only wonder how far I've pushed the original Kroz
engine designs beyond the original author's intentions.
Still, one should consider what kind of game Cruz is, and what its
strengths and limitations are. Cruz is, fundamentally, an adventure-style game.
It falls between the action and puzzle genres.
The key to a successful design in Cruz is to allow the user's
decisions and curiosity to rule the day. Some staples of video games, like
scripted surprises, strategic item collection, and creative enemy placement,
should apply to Cruz levels. But some level design characteristics should be
expressly avoided.
Fortunately, Cruz is not such an action-intensive game
that a million revisions will be needed just to properly gauge
platform-jump timing, or anything like that. The arrangement of the gridded
types gives you a pretty good idea of what will happen when the player moves to
certain areas in the level. Observe, and decide.
It is probably easier to talk about what should be avoided. The
following are common pitfalls to level design:
No exit stairs in unordered level. Remember,
you will need at least one STAIRS type, or else one STRIGGER_STAIRS type. You
could be cruel and make a dead-end level if the episode is designed in a
nonlinear fashion, but this will irritate people.
Bomb blasts that don't reach, or reach too far. Do
test your designs out to see if the desired effect from a bomb, illumination
bomb, or obscuration bomb have the desired effect.
Excess of lava. Lava takes 10 gems away, which is
cruel. With only a few exceptions, you should not require the user to cross
long stretches of lava, but rather use it as a type to avoid touching. Also,
don't make it grow too fast, if it grows. Look at the original Super Kroz
Trilogy and Lost Adventures game files to see at what constitutes reasonable
growth rates.
Not enough whips or teleports. Caverns of Kroz had
this problem, big time. You might be designing the episode for an expert, but
your goal is to entertain the player.
Too many enemies blocking the player. If the user
must walk down a narrow corridor, don't place too many enemies in the
corridor. Whips and gems might be in short supply, and having to run
through tough enemy after tough enemy will annoy players.
Not enough power rings. It takes 5 power rings to
make a whip powerful enough to destroy all breakable walls with one
strike. Keep this in mind when forcing the player to whip through lots of
breakable walls. Also, don't forget that you can use #GIVE in Cruz to power up
the user's whip.
Excess clutter in unordered level. Unordered
levels provide a prime opportunity to throw hundreds of enemies at the player.
While not a bad thing in itself, there is such a thing as too many enemies.
Unless it's the last level in the episode, the player will end up wasting
inventory and getting very hurt, despite his or her best intentions.
Not enough room to move in unordered level. Too
many solid walls will make lucky teleportation mandatory for finishing the
level.
Poor use of invisible doors.The most likely place
to find an invisible door is near the exit stairs, so the player will expect
them there. But placing invisible doors in any arbitrary location will make the
player waste keys, which will force a level restart.
Poor use of invisible walls. The player should
hardly ever have to make an impossible guess about where invisible terrains are
located, with potentially fatal results if the guess is incorrect. Invisible
terrains should either be half-expected or non-debilitating if unexpected. If
you require the user to make a so-called "leap of faith," it should be because
process of elimination suggests that it is an appropriate course of action.
Sloppy tunnel layout. Tunnels are best arranged
with only one exit spot per tunnel. If more than one exit spot exists for a
tunnel, try not to make some tunnels have 8 exit spots while others have only
one, because the tunnel with only one exit spot will be picked less
often. Also try not to design multiple exit spots from the same tunnel to
be completely inaccessible from each other.
Excessive bottomless pit navigation challenge. There
are no restore points within a single level. If the player must navigate a
complex walkway over a pit, make the challenge somewhat short, and preferably
at the start of the level, which limits the backtracking time if the player
falls.
Invincible statues. It's just plain mean to put a
statue in the very first level, without giving the player the ability to
collect adequate gems or whip power-ups. Placing too many statues in the
level will cause a similar issue, making statues not worth destroying even with
a powered-up whip. Surrounding a statue with solid walls should only be done if
you want the player to rush through the level to escape taking too much damage.
Poor use of open or close spells as traps. Unexpectedly
trapping the player is not necessarily something to avoid--this is a
dungeon-based game, after all. But determinism is important when scripting
open/close events, because the player must feel like real progress is being
made, instead of just lucky or unlucky guesses about where to step. Also,
because open/close events do not kill the player outright if they are designed
as traps, be sure that the player understands that a level restart is, in fact,
necessary.
Okay, now that I've said all that, forget it all and start
designing!
Other Info
Various stuff that doesn't fit into any other part of the
documentation...
List of Game Files
kroz_kingdom_i.xml : Kingdom of
Kroz I
kroz_kingdom_ii.xml : Kingdom of Kroz II
kroz_caverns.xml : Caverns of Kroz
kroz_dungeons.xml : Dungeons of Kroz
kroz_return.xml : Return to Kroz
kroz_temple.xml : Temple of Kroz
kroz_final_crusade.xml : Final Crusade of Kroz
kroz_lost_adventures.xml : Lost Adventures of Kroz
cruz_underground_empire.xml : The Underground Empire of Cruz
textchars.xml : Sample of text characters that can be used on
the text layer
sample.xml : Sample of general level design
Using the Development Version of Cruz
The development-version files Cruz.html and Cruz.swf are designed
to run local content only. If you have created custom content with CruzEditor,
you can only run your content from this version, not any version found online.
Cruz.html can be run from any web browser that supports Flash 10.
All music tracks must be separately downloaded from
http://www.chriskallen.com if you are going to integrate music into
your episode. The installer does not provide these tracks.
If you have come up with an episode that you would like to submit
for others to play online, please e-mail me at
chris@chriskallen.com. If your designs are good, I'll host it at
http://www.chriskallen.com, which will allow it to be played on that
site as well as any other online portal site.
Comments and Suggestions
Forward to chris@chriskallen.com.
About Me
My name is Christopher Allen (a.k.a.
Appetite4Deduction) and I approve this message.
I have made several video games in the past. Check out these
sites:
http://www.chriskallen.com
http://www.angelfire.com/space/debrischris
This documentation is Copyright © 2011 Christopher Allen.


